Step 5: Add the Eggs
Add the eggs one at a time, beating well after each addition.
Avoid adding all the eggs at once because this can cause the butter mixture to separate.
If the mixture looks slightly curdled, don’t worry. Adding the dry ingredients gradually should bring the batter together.
Scrape down the sides of the bowl occasionally to ensure everything is evenly incorporated.
Step 6: Incorporate the Flour and Milk
Reduce the mixer speed to low.
Add approximately one-third of the flour mixture to the butter mixture and mix gently. Pour in half of the milk and continue mixing.
Repeat the process, alternating between the remaining flour mixture and milk, finishing with the flour.
Mix only until the ingredients are combined. Overmixing at this stage can make the cake dense instead of soft and tender.
The batter should be thick but smooth.
Step 7: Fold in the Fruit
Add the prepared dried fruit mixture to the batter.
If you’re including walnuts or pecans, add them now.
Using a large spatula or wooden spoon, gently fold everything together until the fruit is evenly distributed.
Take your time with this step. You want every part of the batter to contain a good mixture of fruit without losing the light texture created when creaming the butter and sugar.
Step 8: Transfer the Batter to the Pan
Spoon the finished batter into your prepared baking pan.
Use a spatula to spread it evenly, making sure the corners and edges are filled.
Smooth the surface gently, then tap the pan lightly against the countertop once or twice to release any large air pockets.
For a traditional finish, you can arrange a few additional candied cherries or nuts on top before baking.
Step 9: Bake Until Golden and Perfectly Cooked
Place the pan on the center rack of your preheated oven.
Bake for approximately 75 to 90 minutes, depending on the size and depth of your pan.
Because fruit cakes are naturally dense, they require more baking time than many ordinary cakes.
Start checking for doneness around the 70-minute mark. Insert a wooden skewer into the center of the cake. If it comes out clean or with a few moist crumbs, the cake is ready.
If the top begins browning too quickly while the center is still undercooked, loosely cover it with aluminum foil and continue baking.
Avoid opening the oven door repeatedly, as sudden temperature changes can affect the cake’s texture.
Step 10: Cool the Cake Properly
Once baked, remove the cake from the oven and place the pan on a wire cooling rack.
Allow it to cool in the pan for approximately 15 to 20 minutes.
Carefully lift the cake out using the parchment paper and transfer it directly to the rack.
Let it cool completely before slicing.
Although it may be tempting to cut into it immediately, allowing the cake to cool helps it firm up and makes it easier to cut into neat slices.
Step 11: Add the Finishing Touches
Once completely cooled, you can enjoy the cake as it is or give it a simple finishing touch.
For a traditional appearance, lightly dust the top with powdered sugar.
If you prefer a richer holiday-style fruit cake, brush the cooled cake with a small amount of brandy or rum. Wrap it tightly in parchment paper and aluminum foil, then allow it to rest for a day before serving.
The resting time allows the flavors to develop and gives the cake an even more delicious aroma.
Tips for Making the Perfect Fruit Cake Every Time
Even though this recipe is beginner-friendly, a few helpful techniques can make a noticeable difference in the final result.
1. Use room-temperature ingredients.
Butter, eggs, and milk should ideally be at room temperature before mixing. This helps them combine smoothly and creates a more consistent batter.
2. Soak the fruit before baking.
Dried fruit can absorb moisture from the cake batter. Soaking it in orange juice beforehand helps keep the finished cake moist and prevents overly hard fruit pieces.
3. Coat the fruit with flour.
A light coating of flour helps the fruit stay distributed throughout the batter. Don’t use too much, as excess flour can affect the cake’s texture.
4. Avoid overmixing.
Once the flour has been added, mix gently. Too much mixing can develop gluten and produce a tougher cake.
5. Bake at a moderate temperature.
Fruit cakes are dense, so a moderate oven temperature allows the center to bake properly without burning the outside.
6. Allow enough cooling time.
Never rush the cooling process. A completely cooled fruit cake is easier to handle, slice, and store.
7. Make it a day ahead.
This cake often tastes even better the following day. The fruit, spices, butter, and citrus flavors have more time to blend together.
Delicious Variations to Try
One of the best things about homemade fruit cake is how easily you can adapt it.
-
Tropical Fruit Cake: Replace some of the raisins with chopped dried pineapple, mango, and coconut for a tropical twist.
-
Nutty Fruit Cake: Add extra pecans, walnuts, or almonds for a satisfying crunch.
-
Citrus Fruit Cake: Add additional orange zest and a little lemon zest for a brighter flavor.
-
Spiced Holiday Fruit Cake: Increase the cinnamon slightly and add a pinch of ground cloves or ginger.
-
Chocolate Fruit Cake: Fold in ½ cup of dark chocolate chips for a richer dessert.
-
Alcohol-Free Fruit Cake: Keep the orange juice and vanilla as the main flavoring ingredients, making this version suitable for the whole family.
What to Serve with Never Fail Fruit Cake
This classic fruit cake is delicious on its own, but pairing it with the right accompaniment makes it even more enjoyable.
For a simple afternoon treat, serve a slice with freshly brewed coffee or black tea. The slightly bitter flavor of the drink balances the sweetness of the dried fruit.
If you’re serving it as a dessert after dinner, add a spoonful of freshly whipped cream or a scoop of vanilla ice cream. The creamy texture pairs beautifully with the dense, buttery cake.
You can also serve it with warm custard for a comforting dessert, especially during the colder months.
For a festive presentation, arrange several slices on a serving platter and decorate with a few candied cherries, orange slices, or chopped nuts.
How to Store Fruit Cake
Proper storage helps preserve the flavor and texture of your homemade fruit cake.
At room temperature: Once completely cooled, wrap the cake tightly in plastic wrap or place it in an airtight container. Store in a cool, dry place for up to 3 to 4 days.
In the refrigerator: Wrap the cake securely and store it in an airtight container for approximately 1 week. Allow individual slices to come to room temperature before serving for the best texture.
In the freezer: Fruit cake freezes particularly well. Wrap the whole cake or individual slices in plastic wrap, followed by aluminum foil, and place them in a freezer-safe container. Freeze for up to 3 months for best quality.
To thaw, transfer the cake to the refrigerator overnight or let individual slices thaw at room temperature.
Frequently Asked Questions
1. Why is my fruit cake dry?
A dry fruit cake is usually caused by overbaking, inaccurate ingredient measurements, or too much flour. Check the cake a little before the suggested baking time and remove it once a skewer comes out clean or with a few moist crumbs.
2. How do I prevent the fruit from sinking to the bottom?
Coat the prepared fruit lightly with flour before adding it to the batter. Also, make sure your batter is thick enough to support the fruit pieces.
3. Can I prepare this fruit cake without alcohol?
Absolutely! This recipe uses orange juice to soak the dried fruit, so there is no need for alcohol. You can simply leave out the optional brandy or rum.
4. Can I use only raisins instead of mixed dried fruit?
Yes. You can replace the mixed fruit with additional raisins if that’s what you have available. However, using different fruits creates a more interesting combination of flavors and textures.
5. How do I know when the fruit cake is fully baked?
Insert a wooden skewer into the center. It should come out clean or with a few moist crumbs. The top should also look golden brown, and the edges should begin pulling slightly away from the pan.
6. Can I make this cake ahead of time?
Yes! Fruit cake is an excellent make-ahead dessert. Preparing it one day before serving gives the flavors time to develop and makes the cake even more enjoyable.
7. Can I make this recipe in a loaf pan?
Yes. Divide the batter between two standard loaf pans if necessary, and begin checking for doneness around 60 to 65 minutes. Baking time will depend on the depth and size of your pans.
A Classic Cake Worth Making Again and Again
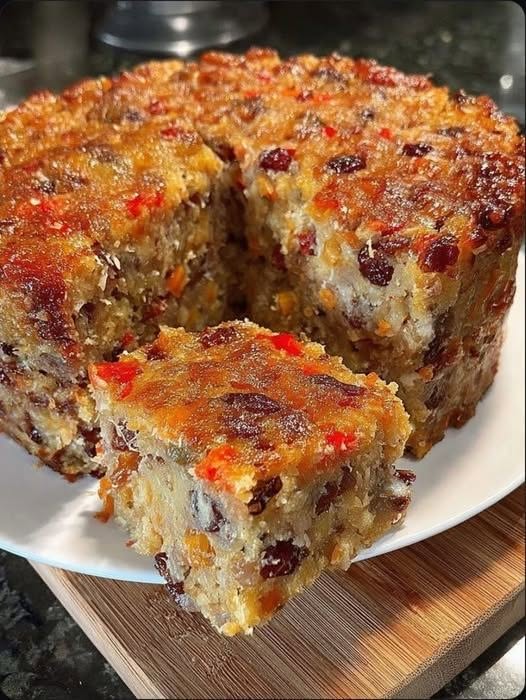
The Never Fail Fruit Cake is proof that some of the best desserts don’t need complicated ingredients or fancy decorating techniques. With its buttery crumb, generous amount of dried fruit, warm spices, and gentle citrus flavor, this traditional recipe delivers everything you want in a homemade fruit cake.
Whether you’re baking it for a special holiday, sharing it with friends, or preparing something delicious to enjoy throughout the week, it’s a dependable recipe worth keeping in your collection.
Make it ahead, let the flavors develop, and serve each slice with your favorite cup of tea or coffee. Once you try this homemade version, it may quickly become one of those classic recipes you’ll find yourself returning to year after year.







No Responses Yet