Step 2: Making the Caramel
- In a medium saucepan over medium heat, combine sugar and water. Stir gently until sugar dissolves.
- Allow the mixture to cook without stirring until it turns a deep amber color, about 8-10 minutes.
- Carefully add the heavy cream while stirring continuously (it will bubble up, so be cautious).
- Stir in the vanilla extract, salt, and butter until fully combined and smooth.
- Let the caramel cool slightly before pouring it evenly over the cooled crunch base.
- Place the dish in the refrigerator for at least 20-30 minutes to allow the caramel layer to firm up.
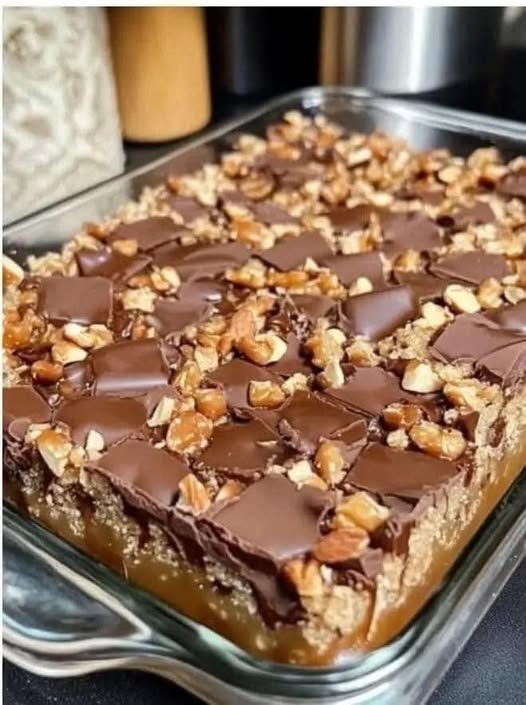
Step 3: Adding the Chocolate Topping
- In a microwave-safe bowl, melt the chocolate chips and coconut oil (or butter) in 30-second intervals, stirring in between until smooth.
- Pour the melted chocolate over the chilled caramel layer, spreading evenly with a spatula.
- Sprinkle with sea salt if desired for an extra flavor contrast.
- Refrigerate the bars for at least 1 hour or until fully set.
Step 4: Cutting and Serving
- Once the bars are fully set, use the parchment paper to lift them out of the baking dish.
- Place on a cutting board and use a sharp knife to cut into squares or rectangles.
- Serve immediately or store in an airtight container in the refrigerator for up to a week.
Tips for Perfect Caramel Chocolate Crunch Bars
- Use a candy thermometer when making caramel to ensure it reaches the right temperature (around 350°F or 175°C for a deep amber color).
- For extra crunch, substitute half of the graham crackers with chopped nuts or crispy rice cereal.
- If your caramel seizes up, reheat it gently over low heat while stirring until smooth.
- Allow proper chilling time before cutting the bars to ensure clean edges and distinct layers.
These Caramel Chocolate Crunch Bars are the perfect mix of textures and flavors—crispy, chewy, and rich. Whether you’re making them for a gathering or a solo indulgence, they’re guaranteed to impress. Enjoy your homemade treat!


No Responses Yet