Step 4: Knead the Mixture
- Once the mixture becomes more solid, take it out of the cup and begin kneading it with your hands.
- Roll and squeeze it together until it forms a smooth, round ball. This should take about 1-2 minutes.
- If it feels too sticky, dip it back into the Borax solution briefly, then continue kneading.
Step 5: Let It Set & Start Bouncing!
- Place the ball on a paper towel or wax paper to dry for about 5–10 minutes.
- Once dry, it’s ready to bounce! Try dropping it from different heights to test its bounciness.
How It Works: The Science Behind Bouncy Balls
The magic behind homemade bouncy balls lies in a cool chemical reaction:
✔ Borax + Glue Reaction: Borax links the glue molecules together, turning the liquid glue into a solid, elastic material.
✔ Cornstarch Role: Cornstarch helps absorb moisture and gives the ball a firmer shape.
✔ Polymer Formation: The glue contains polyvinyl acetate (PVA), which, when mixed with Borax, creates a polymer chain—a flexible, stretchy material perfect for bouncing!
Tips for the Best Bouncy Ball
✅ Use Fresh Borax Solution – If your ball isn’t forming well, try making a fresh Borax mixture.
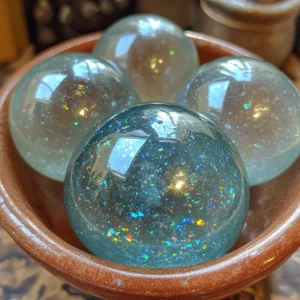
✅ Experiment with Colors – Mix different food colorings for a cool marble effect!
✅ Roll It Smoothly – The rounder the ball, the better it will bounce.
✅ Store It Properly – Keep your bouncy ball in a sealed plastic bag to prevent drying out.
Conclusion: Have Fun Making & Bouncing!
Making your own super bouncy ball at home is not just a fun craft—it’s also a great way to learn about polymers, chemistry, and elasticity. Whether you’re a science enthusiast or just looking for a creative activity, this DIY project is easy, inexpensive, and exciting.
Try making different sizes, colors, or even glow-in-the-dark bouncy balls! Have you tried this experiment? Let me know how your bouncy ball turned out! 🎾✨


No Responses Yet