
Step 4: Cream Butter and Sugar
- In a large mixing bowl, cream the butter and brown sugar until light and fluffy, about 3–4 minutes.
- Beat in eggs one at a time, ensuring each is fully incorporated before adding the next.
- Stir in vanilla extract.
Step 5: Combine Wet and Dry Ingredients
- Gradually fold the dry ingredients into the wet mixture using a spatula or wooden spoon.
- Slowly mix in the soaked fruit and nuts until evenly distributed.
Tip: Lightly flour the fruit and nuts before adding them to the batter. This prevents them from sinking to the bottom during baking.
Step 6: Bake
- Pour the batter into your prepared pan and smooth the top with a spatula.
- Bake at 325°F (165°C) for 1 hour 15 minutes to 1 hour 30 minutes, or until a toothpick inserted in the center comes out clean.
- If the top browns too quickly, loosely cover the cake with foil halfway through baking.
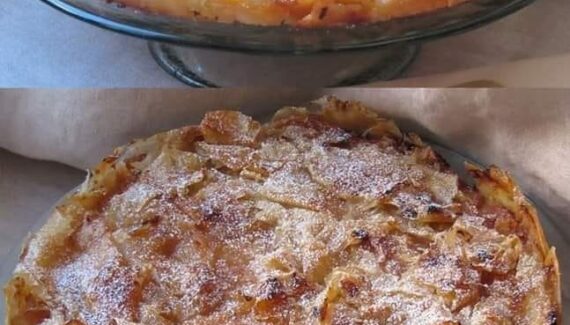
Step 7: Cool and Store
- Let the cake cool in the pan for 15–20 minutes, then transfer it to a wire rack.
- For maximum flavor, wrap the cooled cake in plastic wrap and let it sit for 1–2 days before serving. Some people even brush the cake with a little more rum or juice every few days to keep it moist and flavorful.
Tips for a Perfect Fruit Cake
- Use a variety of fruits: Mixing textures and flavors creates a richer cake.
- Don’t rush soaking the fruit: The longer the fruit soaks, the more flavorful the cake.
- Low and slow baking: Baking at a lower temperature ensures the cake cooks evenly without drying out.
- Optional glaze: For a shiny, festive finish, brush the top with apricot jam while the cake is still warm.
This “Fruit Cake That Always Turns Out Perfect” is moist, aromatic, and rich with fruit and spices. Once you master this recipe, it will become your go-to for holidays, birthdays, or any special occasion. Serve it with tea, coffee, or a splash of cream for a dessert that impresses every time.
If you want, I can also make a simplified illustrated step-by-step guide with images for each stage—it makes this kind of cake way easier to visualize while baking. Do you want me to do that?


No Responses Yet