Step 3: Let the Eggs Sit
Leave the eggs soaking in vinegar for 24–48 hours. After the first 24 hours:
- Carefully remove the egg with a spoon.
- Gently rinse it under cool water and rub off any leftover shell.
If any shell remains, return it to the vinegar for another 12–24 hours.
Science Fact: The vinegar dissolves the hard shell but leaves the soft membrane intact, turning it into a rubbery, bouncy egg!
Step 4: Add the Glow (Optional)
For a glowing ghost effect:
- Once the eggs are fully de-shelled, gently paint them with a thin layer of glow-in-the-dark paint.
- Let them dry fully before handling.
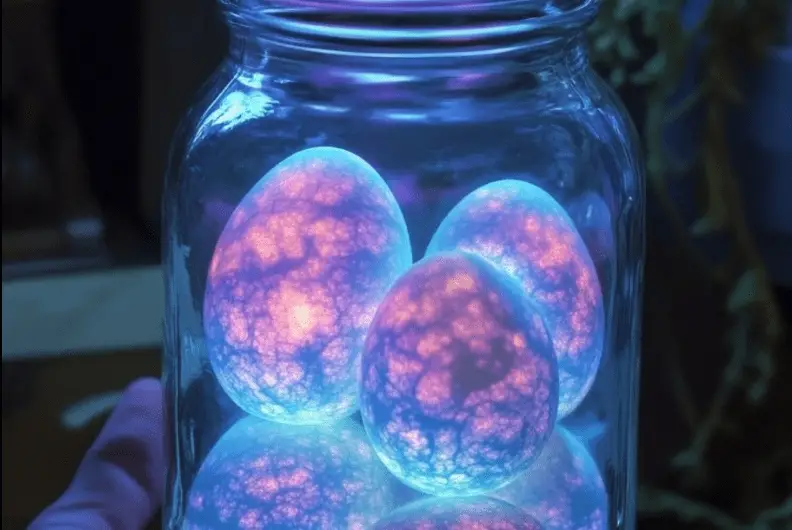
- Alternatively, shine a UV flashlight on the egg to make it glow, especially in a dark room!
Step 5: Time to Bounce!
Place a paper towel on a table or counter and test your ghost egg by gently dropping it from 1–2 inches high. It should bounce! Be careful — dropping it from too high can still cause the membrane to break.
Warning: The inside is still raw egg, so handle with care to avoid a messy (and smelly) Halloween surprise.
🎓 Educational Benefits
- Chemistry: Kids learn about acid-base reactions (vinegar and eggshell).
- Biology: Teaches about the egg’s anatomy — shell, membrane, yolk.
- Art & Creativity: Decorating ghost faces and using glow effects.
- Physics: Basic understanding of elasticity and impact forces.
🧼 Clean-Up and Safety Tips
- Always supervise young children.
- Use gloves if needed when handling vinegar.
- Discard used vinegar and eggs properly.
- Wash hands thoroughly after the activity.
🕯️ Conclusion
Bouncy Ghost Eggs aren’t just spooky and fun — they’re a science experiment kids will remember long after Halloween! With just a few household items, you can create a ghostly craft that teaches, entertains, and even glows in the dark. Try it out this Halloween and let the bouncy ghost fun begin! 👻🎃
Would you like a printable version or a classroom activity worksheet to go with this experiment?
Step 3: Let the Eggs Sit
Leave the eggs soaking in vinegar for 24–48 hours. After the first 24 hours:
- Carefully remove the egg with a spoon.
- Gently rinse it under cool water and rub off any leftover shell.
If any shell remains, return it to the vinegar for another 12–24 hours.
Science Fact: The vinegar dissolves the hard shell but leaves the soft membrane intact, turning it into a rubbery, bouncy egg!
Step 4: Add the Glow (Optional)
For a glowing ghost effect:
- Once the eggs are fully de-shelled, gently paint them with a thin layer of glow-in-the-dark paint.
- Let them dry fully before handling.
- Alternatively, shine a UV flashlight on the egg to make it glow, especially in a dark room!
Step 5: Time to Bounce!
Place a paper towel on a table or counter and test your ghost egg by gently dropping it from 1–2 inches high. It should bounce! Be careful — dropping it from too high can still cause the membrane to break.
Warning: The inside is still raw egg, so handle with care to avoid a messy (and smelly) Halloween surprise.
🎓 Educational Benefits
- Chemistry: Kids learn about acid-base reactions (vinegar and eggshell).
- Biology: Teaches about the egg’s anatomy — shell, membrane, yolk.
- Art & Creativity: Decorating ghost faces and using glow effects.
- Physics: Basic understanding of elasticity and impact forces.
🧼 Clean-Up and Safety Tips
- Always supervise young children.
- Use gloves if needed when handling vinegar.
- Discard used vinegar and eggs properly.
- Wash hands thoroughly after the activity.
🕯️ Conclusion
Bouncy Ghost Eggs aren’t just spooky and fun — they’re a science experiment kids will remember long after Halloween! With just a few household items, you can create a ghostly craft that teaches, entertains, and even glows in the dark. Try it out this Halloween and let the bouncy ghost fun begin! 👻🎃
Would you like a printable version or a classroom activity worksheet to go with this experiment?


No Responses Yet