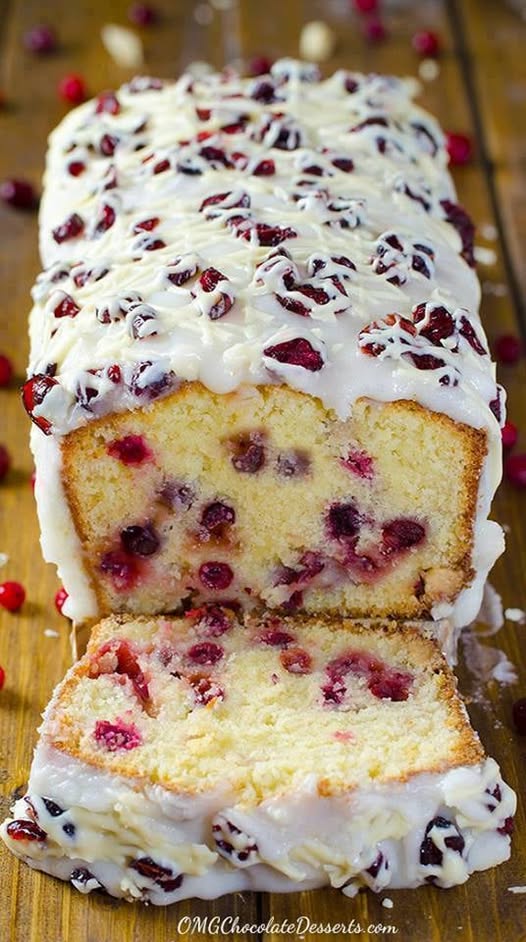
Step 4: Cream the Butter and Sugar
In a large mixing bowl, add the softened butter and granulated sugar.
Using an electric mixer on medium-high speed, beat them together for approximately 4–5 minutes until the mixture becomes pale, fluffy, and creamy.
This step is particularly important for pound cake because incorporating air into the butter and sugar helps create a lighter texture.
Scrape down the sides and bottom of the bowl occasionally to ensure everything is evenly mixed.
Step 5: Add the Eggs
Add the eggs one at a time, beating well after each addition.
Allow each egg to become fully incorporated before adding the next one. This helps maintain a smooth batter and prevents the mixture from separating.
Once all four eggs have been added, mix in the vanilla extract and orange zest.
The vanilla gives the cake its classic sweet aroma, while the orange zest adds a refreshing citrus note that pairs beautifully with the cranberries.
Step 6: Alternate the Dry Ingredients and Sour Cream
Reduce the mixer speed to low.
Add approximately one-third of the flour mixture to the butter mixture and mix just until combined.
Next, add half of the sour cream and mix gently.
Continue alternating the remaining flour mixture and sour cream, beginning and ending with the flour mixture.
The order should be:
-
One-third of the dry ingredients.
-
Half of the sour cream.
-
Another third of the dry ingredients.
-
The remaining sour cream.
-
The final portion of the dry ingredients.
Mix only until the ingredients are incorporated. Avoid overmixing, as this can make the pound cake dense or tough.
The finished batter should be thick, smooth, and creamy.
Step 7: Fold in the Cranberries
Add the flour-coated cranberries to the batter.
Using a rubber spatula, gently fold them in until they are evenly distributed.
Take your time with this step so the cranberries remain intact and don’t release too much juice into the batter.
If desired, reserve a few cranberries to decorate the top of the cake after baking.
Step 8: Transfer the Batter to the Pan
Carefully spoon the batter into the prepared Bundt pan.
Spread it evenly using a spatula, making sure there are no large air pockets.
Gently tap the pan against the countertop once or twice to help settle the batter.
Smooth the surface so the cake bakes evenly.
Step 9: Bake Until Golden and Perfectly Cooked
Place the Bundt pan in the preheated oven and bake for approximately 70–85 minutes.
Baking times may vary depending on your oven and the type of pan you’re using.
Begin checking the cake around the 65-minute mark. Insert a wooden skewer or toothpick into the thickest part of the cake. If it comes out clean or with a few moist crumbs, the cake is ready.
If the top begins browning too quickly before the center is fully baked, loosely cover it with aluminum foil for the remaining baking time.
Once baked, remove the cake from the oven and allow it to cool in the pan for approximately 15–20 minutes.
Step 10: Remove and Cool the Cake
After the cake has rested, carefully run a thin knife around the edges if necessary.
Place a wire cooling rack or serving plate over the Bundt pan and gently invert it.
The cake should release from the pan with its beautiful shape intact.
Allow it to cool completely before adding the glaze. Glazing a warm cake can cause the icing to melt and disappear into the surface.
Step 11: Prepare the Vanilla Glaze
While the cake cools, prepare the simple vanilla glaze.
In a small bowl, combine the powdered sugar, milk or heavy cream, and vanilla extract.
Whisk until the mixture becomes smooth and glossy.
If the glaze is too thick, add a little more milk, approximately one teaspoon at a time.
If it becomes too thin, add a little extra powdered sugar.
You want a consistency that is thick enough to cling to the cake but thin enough to drizzle beautifully down its sides.
Step 12: Decorate and Serve
Once the pound cake has cooled completely, drizzle the vanilla glaze generously over the top.
Allow some of the glaze to naturally run down the sides for a lovely homemade appearance.
For a festive Christmas finish, decorate with a few fresh cranberries, a sprinkle of orange zest, and small rosemary sprigs.
You can also dust the cake lightly with powdered sugar to create a beautiful winter-inspired presentation.
Allow the glaze to set for approximately 15–20 minutes before slicing.
Serve and enjoy!
Tips for Making the Perfect Cranberry Pound Cake
A few simple baking tips can make a noticeable difference in the final texture and flavor.
Use room-temperature ingredients: Butter, eggs, and sour cream should be at room temperature. This helps everything combine smoothly and creates a more consistent batter.
Don’t overmix the batter: Once the flour is added, mix gently and only until combined. Overmixing can develop too much gluten, resulting in a tougher cake.
Choose fresh cranberries when possible: Fresh cranberries provide a wonderful tart flavor and maintain their shape during baking. Frozen cranberries also work well without thawing.
Coat the cranberries with flour: A light coating helps distribute the berries throughout the batter.
Be patient when cooling: Allow the cake to cool completely before glazing. This keeps the glaze thick and attractive instead of letting it melt.
Check for doneness carefully: Pound cakes are thick, so the outside may look ready before the center is fully baked. Always check the middle with a wooden skewer.
Delicious Variations to Try
One of the best things about this recipe is how easily you can customize it.
Cranberry Orange Pound Cake
For a stronger citrus flavor, increase the orange zest to 2 teaspoons and replace 1 tablespoon of the milk in the glaze with fresh orange juice. The combination of cranberry and orange creates a bright, refreshing holiday flavor.
White Chocolate Cranberry Pound Cake
Fold ½ cup of white chocolate chips into the batter along with the cranberries. The creamy sweetness of white chocolate complements the tart berries beautifully.
Almond Cranberry Pound Cake
Replace the vanilla extract with 1 teaspoon of almond extract, or use half vanilla and half almond extract. Add sliced almonds over the glaze for extra texture.
Cream Cheese Cranberry Pound Cake
Replace half of the sour cream with softened cream cheese, beating it into the butter mixture before adding the eggs. This creates a richer, slightly tangier cake.
Lemon Glazed Cranberry Cake
Instead of vanilla glaze, combine powdered sugar with fresh lemon juice. The bright lemon flavor adds a refreshing contrast to the sweet cake and tart cranberries.
What to Serve with Christmas Cranberry Pound Cake
This cake is delicious on its own, but pairing it with something simple can make it even more special.
-
Hot chocolate: A warm mug of creamy hot chocolate makes a wonderful winter pairing.
-
Coffee: The buttery sweetness of the cake goes beautifully with freshly brewed coffee.
-
Vanilla ice cream: Serve a slice with a scoop of vanilla ice cream for an easy holiday dessert.
-
Whipped cream: A spoonful of lightly sweetened whipped cream adds a soft, creamy finish.
-
Hot tea: Black tea, cinnamon tea, or orange-spiced tea complements the cranberry flavor.
How to Store Christmas Cranberry Pound Cake
Proper storage helps keep your pound cake moist and flavorful for several days.
At room temperature: Store the completely cooled cake in an airtight container for up to 2 days in a cool environment.
In the refrigerator: Place the cake in an airtight container and refrigerate for up to 5–6 days. Allow individual slices to come to room temperature before serving for the best texture.
In the freezer: This pound cake freezes beautifully. Wrap individual slices or the entire unglazed cake tightly in plastic wrap, followed by aluminum foil. Store in a freezer-safe container for up to 3 months.
For the best results, freeze the cake without the glaze and decorate it after thawing.
To thaw: Transfer the frozen cake to the refrigerator overnight or let individual slices thaw at room temperature for approximately 1–2 hours.
Frequently Asked Questions
Can I use frozen cranberries instead of fresh ones?
Absolutely! Frozen cranberries work perfectly in this recipe. Add them directly to the batter without thawing. This helps prevent excess moisture and keeps the cranberries from becoming too soft.
Can I make this cake ahead of Christmas?
Yes! You can bake the cake 1–2 days before serving and store it in an airtight container. Prepare the glaze and decorate the cake shortly before serving for the freshest appearance.
Why is my pound cake dry?
A dry pound cake can result from overbaking, measuring too much flour, or overmixing the batter. Measure the flour carefully using the spoon-and-level method, and begin checking for doneness before the estimated baking time is over.
Can I make this recipe without sour cream?
Yes. Plain full-fat Greek yogurt is a good substitute for sour cream in equal amounts. It provides similar moisture and a pleasant tangy flavor.
Can I bake this cake in a loaf pan?
Yes! Divide the batter between two standard 9 × 5-inch loaf pans. Baking time will vary, so begin checking for doneness around 50–55 minutes.
How do I prevent the cranberries from sinking?
Tossing the cranberries with a tablespoon of flour before folding them into the batter can help. Also, avoid making the batter too thin by following the ingredient measurements carefully.
A Sweet Christmas Tradition Worth Sharing
Christmas Cranberry Pound Cake is the kind of homemade dessert that makes holiday gatherings feel extra special. Its rich, buttery texture, beautiful cranberry filling, and sweet vanilla glaze create a delicious combination that everyone can enjoy.
Whether you’re preparing it for Christmas dinner, bringing it to a holiday party, or simply baking something special for your family, this cake is a wonderful way to celebrate the season. Make it ahead, decorate it with festive cranberries and orange zest, and serve each slice with your favorite warm drink.
One bite of this soft, flavorful pound cake is enough to make it a holiday favorite you’ll want to bake year after year!




No Responses Yet