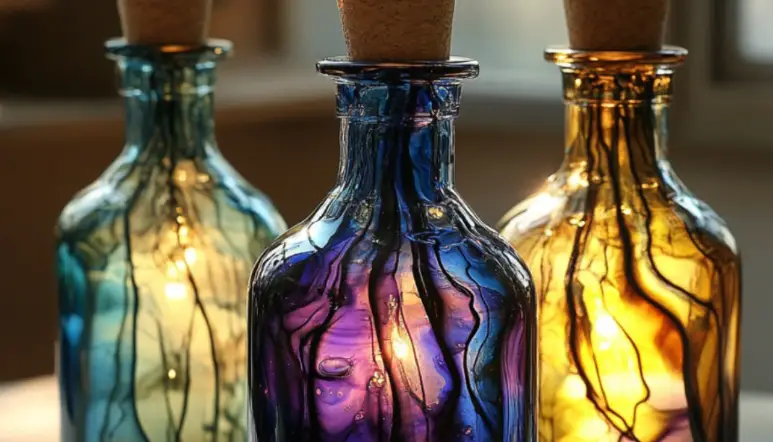
Step 4: Insert the Lights
Gently feed the lights into the bottle. If using cork-style bottle lights, just insert the cork at the top once the lights are in. For longer light strings, use a stick or pencil to guide them evenly throughout the bottle.
Step 5: Decorate the Outside (Optional)
Add a personal touch to your bottle using:
- Twine or jute rope wrapped around the neck for a rustic look
- Beads, ribbons, or charms tied around the opening
- Stencils and spray paint for custom silhouettes (stars, moons, letters)
Step 6: Display Your Magical Creations
Your Colorful Bottle Lights are now ready to glow! Place them:
- On shelves or mantels for soft, ambient light
- As centerpieces on dining tables
- Lined along pathways or garden walls for outdoor magic
- Hung by the neck using wire or macramé bottle holders
Maintenance Tips
- Turn off lights when not in use to preserve battery life.
- If using painted or glued bottles, avoid getting them wet when cleaning.
- Keep out of reach of small children if using glass or small battery components.
Creative Variations
- Themed Bottles: Use holiday colors (red and green for Christmas, orange and black for Halloween).
- Glitter Bottles: Add glitter inside the bottle for extra sparkle.
- Frosted Glow: Use frosted glass spray for a soft diffused light.
Final Thoughts
Colorful Bottle Lights are more than just DIY decor—they’re a fusion of art, recycling, and ambiance. Whether you’re creating a cozy corner in your bedroom or lighting up a summer patio party, these glowing bottles add a touch of magic to any space.
So gather those empty bottles, pick your favorite colors, and start crafting your own luminous wonderland!
Would you like a printable checklist or a short video-style storyboard guide for this DIY project?


No Responses Yet