
Here’s a detailed, original article written in a warm, home-kitchen style, with clear step-by-step instructions 👇
Mom’s Famous Cream Puffs: A Timeless Dessert Everyone Falls in Love With
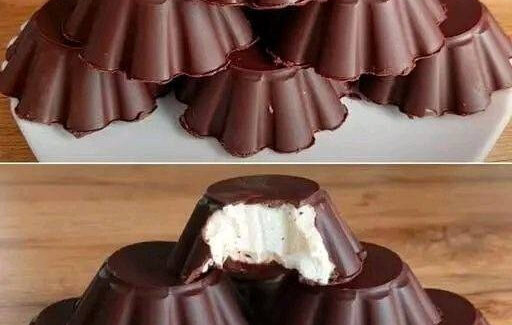
There are some desserts that instantly bring back memories of family gatherings, special Sundays, and that irresistible smell coming from the oven. Mom’s Famous Cream Puffs are one of those classics. Light, airy pastry shells filled with silky cream and topped just the way you like—these cream puffs are elegant enough for guests yet simple enough to make at home.
Despite their bakery-style look, cream puffs are surprisingly easy when you follow the steps carefully. Let’s walk through the process from start to finish so you can recreate this cherished treat in your own kitchen.
What Makes These Cream Puffs So Special
Cream puffs are made from choux pastry, a unique dough that puffs up in the oven thanks to steam rather than yeast or baking powder. The result is a hollow shell with a crisp exterior and soft interior—perfect for filling with rich, creamy goodness. Mom’s version focuses on balance: not too sweet, not too heavy, just perfectly comforting.
Ingredients You’ll Need
For the Cream Puff Shells
- 1 cup water
- ½ cup unsalted butter
- 1 cup all-purpose flour
- 4 large eggs
- ¼ teaspoon salt
For the Cream Filling
- 2 cups heavy whipping cream
- ¼ cup powdered sugar (adjust to taste)
- 1 teaspoon vanilla extract
Optional toppings: powdered sugar, chocolate sauce, or caramel drizzle
Step-by-Step Method
Step 1: Prepare the Choux Dough
Start by preheating your oven to 400°F (200°C). Line a baking sheet with parchment paper.
In a medium saucepan, combine the water, butter, and salt. Heat over medium heat until the butter fully melts and the mixture begins to boil. Once boiling, remove the pan from heat and immediately add the flour all at once. Stir vigorously with a wooden spoon until the mixture forms a smooth dough and pulls away from the sides of the pan.
Step 2: Cool Slightly and Add Eggs
Let the dough cool for about 5 minutes. This step is important so the eggs don’t cook when added.
Add the eggs one at a time, mixing well after each addition. The dough will look separated at first, but keep stirring—it will come together into a thick, glossy batter. The final texture should be smooth and able to hold its shape.
Please Head On keep on Reading (>)


No Responses Yet