
Step 4: Add the Eggs and Vanilla
Add the two eggs, followed by the egg yolk and vanilla extract.
Whisk until everything is well combined and the mixture becomes smooth.
The extra egg yolk contributes richness and helps give the finished blondies their soft, chewy center without adding too much additional liquid.
Step 5: Add the Dry Ingredients
Add the flour mixture to the wet ingredients.
Switch from a whisk to a rubber spatula and gently fold everything together.
Stop mixing as soon as you no longer see obvious streaks of flour.
Do not overmix. Too much mixing can develop the gluten in the flour and make the blondies tougher rather than soft and chewy.
Step 6: Build the First Layer
Spread approximately half of the blondie batter into the prepared pan.
Use a spatula to gently push the batter toward the corners and smooth the surface.
The batter will be fairly thick, so take your time spreading it into an even layer.
Step 7: Add the Salted Caramel
Warm the caramel sauce very briefly if it is too thick to spread easily. It should be soft enough to spoon over the batter but not hot.
Drop spoonfuls of caramel over the first layer of blondie batter.
Sprinkle the caramel with the flaky sea salt.
You can leave the caramel in distinct pockets for dramatic gooey sections, or gently drag a knife through it to create subtle caramel swirls.
Avoid spreading the caramel completely to the edges. Leaving a small border helps keep the caramel contained as the blondies bake.
Step 8: Add the Remaining Batter
Carefully spoon the remaining blondie batter over the caramel layer.
Because the batter is thick, do not press down aggressively. Instead, place small spoonfuls across the surface and gently connect them with your spatula.
The goal is to cover most of the caramel without pushing all of it toward the edges.
Step 9: Bake Until Gooey
Place the pan in the preheated oven.
Bake for approximately 28–35 minutes.
The exact baking time will depend on your oven and the pan you use.
Look for these visual clues:
- The edges should look golden and set.
- The top should have a lightly crackled appearance.
- The center should still look slightly soft.
- A toothpick inserted near the center may come out with a few moist crumbs.
Do not wait until the toothpick comes out completely clean. That usually means the blondies have been baked too long for a gooey center.
If the top becomes golden before the center is ready, loosely cover the pan with foil for the remaining baking time.
Step 10: Let Them Cool Completely
Remove the blondies from the oven and place the pan on a cooling rack.
Allow them to cool completely in the pan.
This step is particularly important for gooey blondies. Straight from the oven, the center will be extremely soft and may appear underbaked. As the blondies cool, the structure firms up while remaining pleasantly fudgy and chewy.
For especially neat slices, refrigerate the cooled blondies for about 30–60 minutes before cutting.
Step 11: Slice and Finish
Use the parchment-paper handles to lift the blondie slab from the pan.
Place it on a cutting board and use a sharp knife to cut it into squares or rectangles.
For an extra finishing touch, drizzle a little additional caramel over the top and sprinkle lightly with flaky sea salt.
A small amount of salt goes a long way, so keep the finishing sprinkle light.
Tips for Perfect Gooey Blondies
Use Brown Sugar Generously
Brown sugar provides moisture as well as flavor, helping create that soft, chewy texture. Packed brown sugar should be measured firmly into the cup if you are not using a kitchen scale.
Don’t Overbake
This is probably the most important tip.
Blondies continue cooking from residual heat after they leave the oven. Removing them when the center is just slightly under-set is what helps create the signature gooey texture.
Choose Thick Caramel
A thick caramel sauce works best because it remains concentrated in the blondies. Very thin caramel can soak into the batter and become difficult to see after baking.
Cool Before Cutting
Cutting warm blondies can result in messy pieces and caramel that has not yet settled. Letting them cool gives you cleaner slices and a better texture.
Add the Salt Carefully
The caramel is already sweet, so flaky sea salt provides a useful contrast. Rather than heavily salting the entire dessert, distribute small amounts throughout the caramel and over the finished bars.
How to Store Them
Once completely cool, place the blondies in an airtight container.
They can generally be kept at room temperature for several days. For longer storage, refrigerate them in a sealed container and allow them to come closer to room temperature before serving.
You can also freeze individual portions. Wrap each piece well, place them in a freezer-safe container or bag, and thaw before serving.
Serving Ideas
These blondies are delicious on their own, but they can easily become a restaurant-style dessert with a few simple additions.
Try serving a slightly warmed blondie with:
- A scoop of vanilla ice cream
- An extra drizzle of salted caramel
- A light sprinkle of flaky sea salt
- Whipped cream
- Chopped toasted pecans or walnuts
The combination of warm blondie, cool vanilla ice cream, and melted caramel is especially delicious.
Final Thoughts
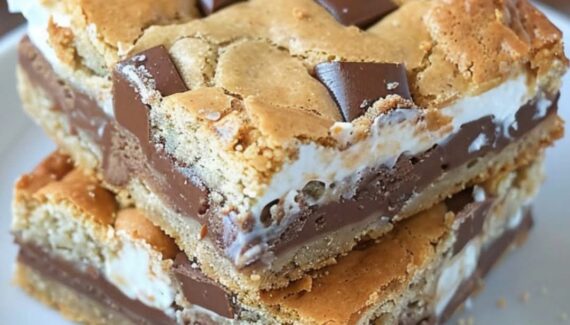
These Salted Caramel Gooey Blondie Bars are all about balance. The buttery brown-sugar blondie provides a rich, chewy base, while the salted caramel adds a smooth, sticky contrast. The final sprinkle of sea salt keeps the dessert from becoming overwhelmingly sweet and brings out the deeper caramel notes.
The key to getting them right is simple: mix gently, layer carefully, and don’t overbake. Once cooled, each square should have golden edges and a soft, chewy middle with delicious pockets of salted caramel.
Whether you’re making them for a family dessert, a bake sale, or simply because you want something sweet with your afternoon coffee, these blondies are an easy treat that delivers plenty of flavor in every bite.




No Responses Yet